Taktika - Unity Game Project

- Published on
- Role
- Lead Developer & Illustrator
Overview
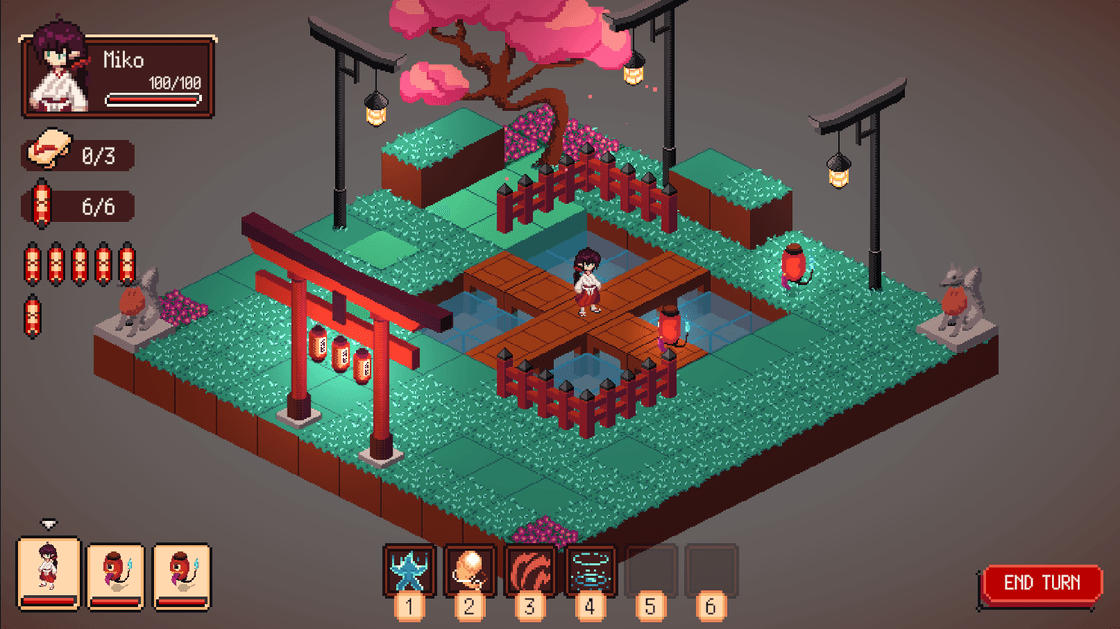
Taktika is my first fully self-developed game prototype, offering a turn-based strategy and roguelike experience, heavily inspired by games such as Dofus, Final Fantasy Tactics, and Hades (for its roguelike elements). The concept is to deliver a Tactical RPG experience in a Roguelike format, where each run is randomly generated. The game is developed using the Unity engine.
Features
- Turn-based combat
- Loot and inventory system
- Character stat system (physical/magical power, resistances, HP, etc.)
- Spellbook with rarity levels and modifiers
- Movement on an isometric grid (supports elevation and z-index simulation)
- AI for enemies with multiple behaviors (rusher, hit & run, support, etc.)
Game Architecture
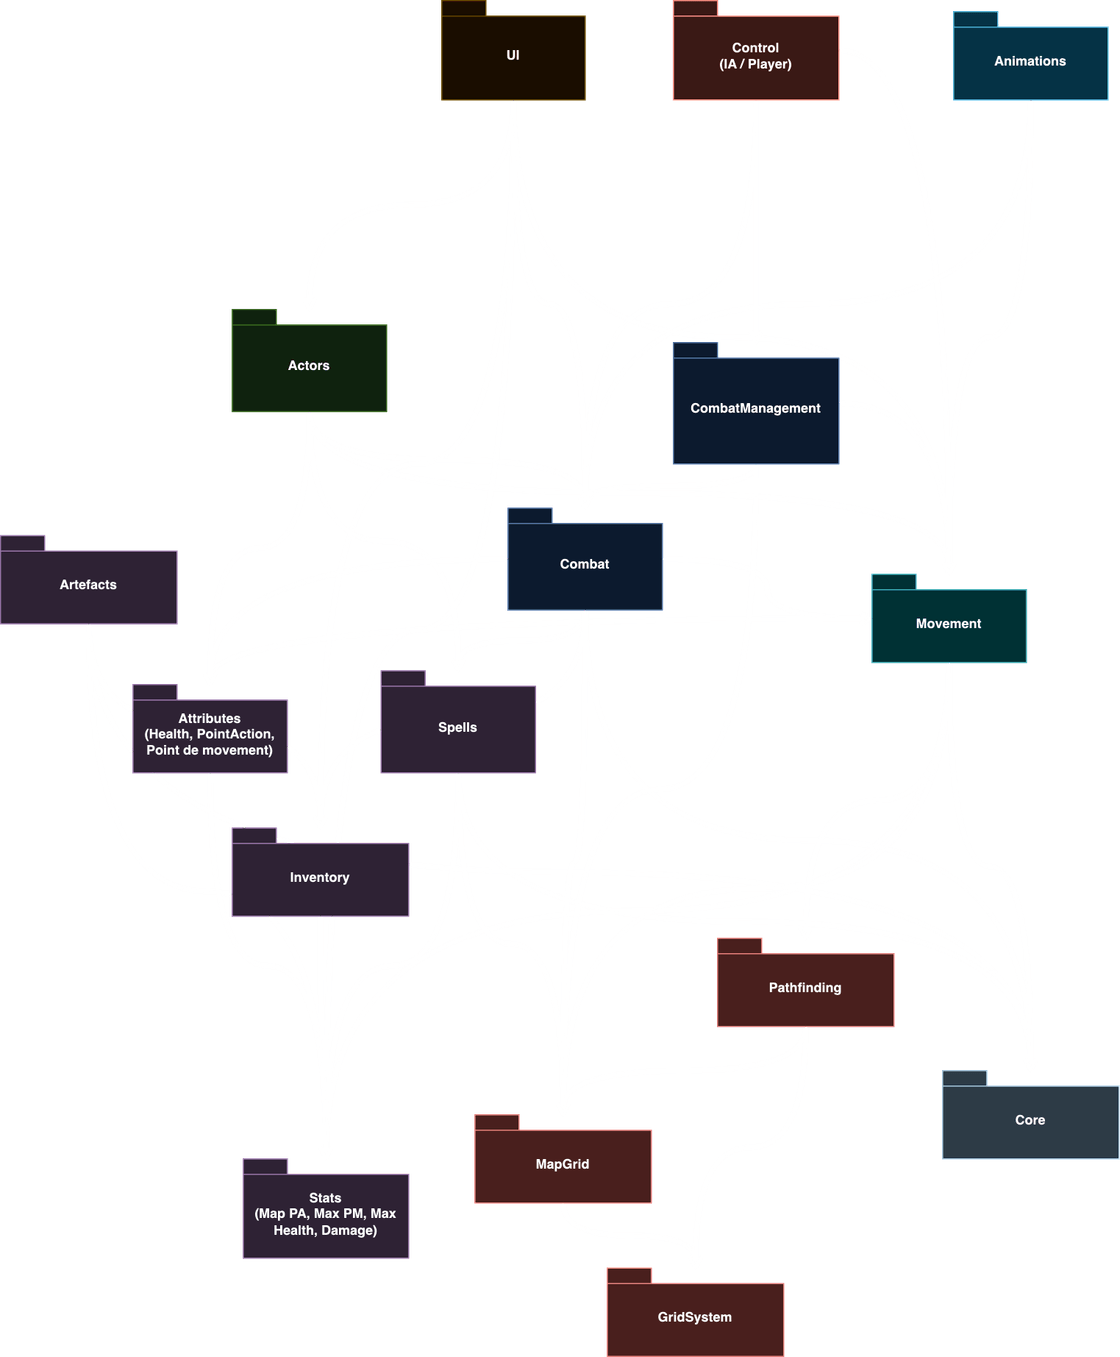
Given the complexity of the codebase, the game’s code is divided into multiple namespaces covering all functionalities. The architecture follows a top-down tree structure to prevent circular dependencies.
Technical challenges
Spell Modifiers
The primary roguelike component of the game lies in the post-room loot system, which grants new spell modifiers that apply to one of the player's six base spells. Players can stack an infinite number of modifiers on a spell. Some examples of possible modifiers include:
- Poison: Adds a poison debuff lasting X turns (deals X damage at the start of each turn).
- Bleeding: Adds a bleeding debuff (deals X damage each time the target moves).
- Push: Pushes the target back by X tiles. If the target cannot be pushed, they take collision damage.
- Back Stab: Increases damage when attacking the target from behind.
- Teleport Damage Bonus: Increases damage when the caster teleports next to an enemy.
- Sniper: Removes the line-of-sight restriction for the spell.
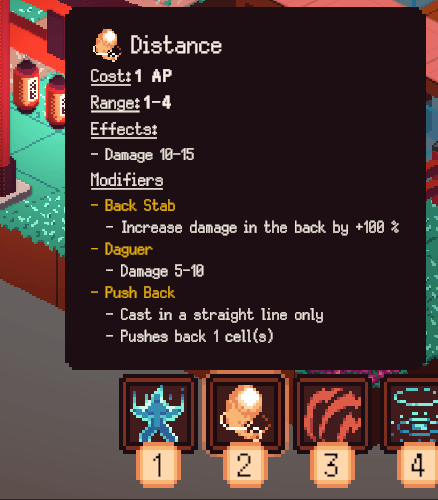
This variety of dynamic modifiers presents the challenge of creating a system that allows easy creation of these modifiers (via Scriptable Objects) and their application to spells. Each spell must iterate through its modifiers and apply their effects when cast.
Grid Data Generation Based on Map Design
The game's grid information (blocked cells, walkable tiles, etc.) is automatically generated by a script that scans the map’s tilemap to create associated metadata. This data can then be used by algorithms like pathfinding to move units.
Character Animation
After testing Unity's built-in state machine system with its animator, I discovered it was unsuitable for frame-based pixel art games. Transitions between states are not instantaneous, as Unity attempts to blend two animations, which conflicts with the real-time state reflection required in my game.
To resolve this, I developed a custom solution to control character animations based on their state. My animator contains no transitions between states in Unity’s editor.
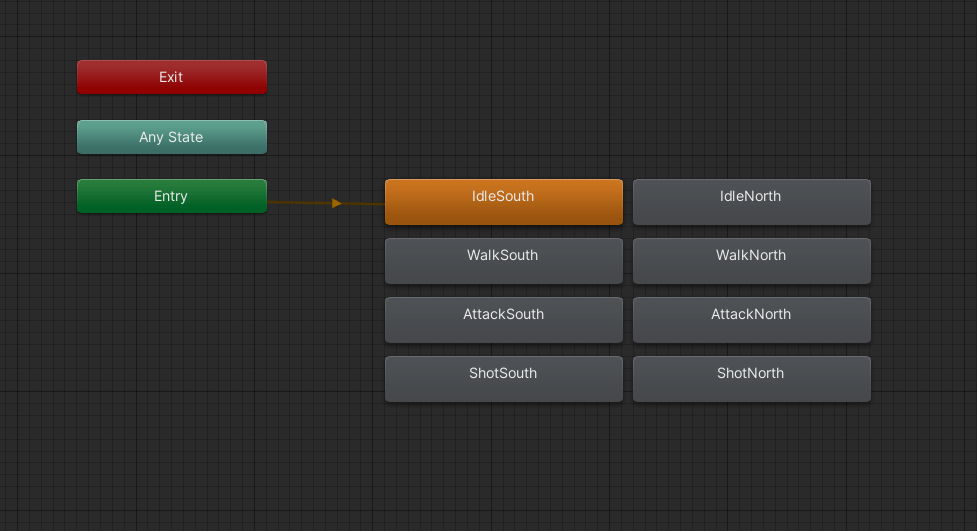
Transitions between animations are directly handled by a MonoBehavior called ActorAnimator, which determines and plays the correct animations based on the character's current state.
 public class ActorAnimator : MonoBehaviour
{
  // actor state
  private int animationCurrentState;
  private bool isAttacking;
  private bool isLaunchingSpell;
  private bool isWalking;

  private void Update()
  {
    if (isAttacking) {
      ChangeAnimationState(Attack);
      return;
    }

    if (isLaunchingSpell) {
      ChangeAnimationState(Shot);
      return;
    }

    if (isWalking) {
      ChangeAnimationState(Walk);
      return;
    }

    ChangeAnimationState(Idle);
  }

  private void ChangeAnimationState(int newAnimationState)
  {
    if (animationCurrentState == newAnimationState) return;

    animator.Play(newAnimationState);

    animationCurrentState = newAnimationState;
  }

  // ...
}
I then subscribe to events from other components, such as the one responsible for character movement, to change the isWalking state to true. This way, the state changes and the walking animation is played directly, replacing the previous state without any transition.
 public class ActorAnimator : MonoBehaviour
{
  // ...
  private void Start(){
    if (TryGetComponent(out Mover mover)) {
      mover.OnStartMoving += Mover_OnStartMoving;
      mover.OnStopMoving += Mover_OnStopMoving;
    }
  }

  private void Mover_OnStopMoving(object sender, EventArgs e)
  {
    isWalking = false;
  }

  private void Mover_OnStartMoving(object sender, Mover.OnMoveArgs e)
  {
    isWalking = true;
  }
}
Character Orientation
Another challenge of making a 2D isometric game is that characters can be oriented in four directions:
- Southeast
- Southwest
- Northeast
- Northwest
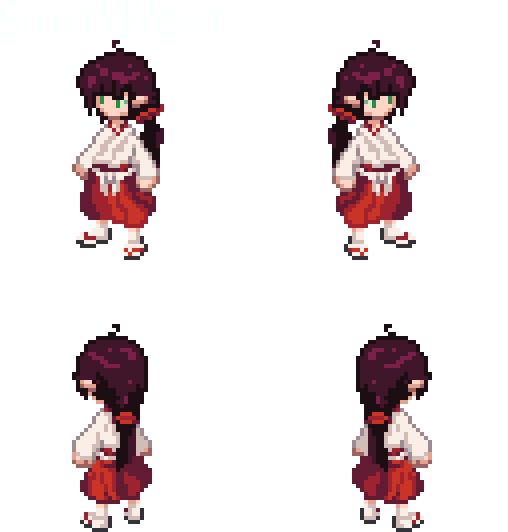
For each sprite, it is necessary to have all four orientations. However, the East orientation can be obtained by mirroring the West orientation. I then developed code to display the correct animation for the character based on its orientation and to determine the character’s orientation relative to its target (the next tile when moving or another character when attacking).
To achieve this, I calculate the angle between the character’s position and its target. Based on the angle in radians, I return the orientation as an enum.
private ActorOrientation GetNextOrientation(Vector2Int moveDirection)
{
  float angle = Mathf.Atan2(moveDirection.y, moveDirection.x) * Mathf.Rad2Deg;

  return angle switch {
    >= -45 and <= 45 => ActorOrientation.SW,
    > 45 and <= 135 => ActorOrientation.SE,
    > 135 or <= -135 => ActorOrientation.NE,
    _ => ActorOrientation.NW
  };
}
I use this GetNextOrientation method within an OrientActor method, which flips the sprite when the character is facing East or restores it to its normal state when facing West.
private void OrientActor(Vector2Int fromGridPosition, Vector2Int toGridPosition)
{
  Vector2Int moveDirection = fromGridPosition - toGridPosition;

  ActorOrientation nextOrientation = GetNextOrientation(moveDirection);

  Vector3 currentScale = sprite.transform.localScale;
  switch (nextOrientation) {
    case ActorOrientation.SW:
    case ActorOrientation.NW:
      if (currentScale.x < 0) {
        currentScale.x *= -1;
        sprite.transform.localScale = currentScale;
      }
      break;
    case ActorOrientation.NE:
    case ActorOrientation.SE:
      if (currentScale.x > 0) {
        currentScale.x *= -1;
        sprite.transform.localScale = currentScale;
      }
      break;
  }
  facingOrientation = nextOrientation;
}
To change the animation based on orientation, I modify the previously introduced ChangeAnimationState method from the state machine section. I check whether the character is facing South or North and play the appropriate animation accordingly.
private void ChangeAnimationState(AnimationKey animationKey)
{
  int newAnimationState = IsFacingSouth() ? animationKey.South : animationKey.North;

  if (animationCurrentState == newAnimationState) return;

  animator.Play(newAnimationState);

  animationCurrentState = newAnimationState;
}
Making Environment Elements Transparent When Units Are Behind Them
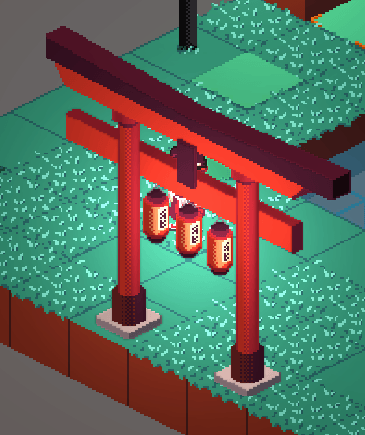
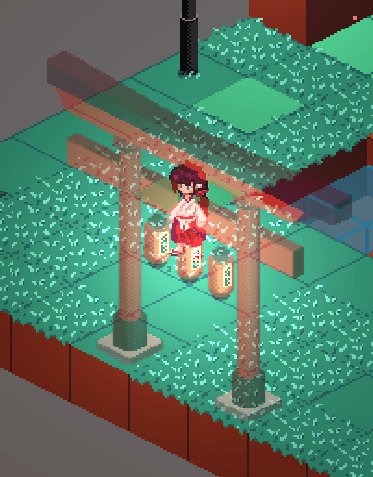
One of the main challenges in creating a 2D isometric game is that game elements can easily overlap to give a 3D illusion, but this can hurt game readability. To address this, I implemented a system to detect overlaps between a unit and an environment element based on their size and position on the grid. If an overlap is detected, the overlapping environment object becomes transparent to improve visibility.
Inventory
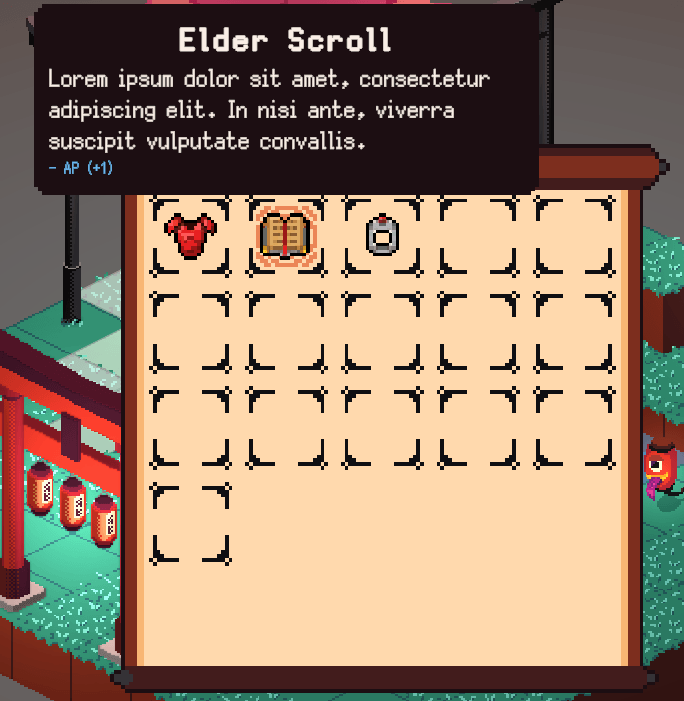
The inventory was developed with maximum decoupling of code and business logic responsibilities. As a result, the inventory does not know the type of items it contains. Each item that can be stored in the inventory must implement an abstract class InventoryItem, which is a ScriptableObject containing only the minimal information needed for the inventory to function. The inventory can then store objects such as Artifacts, which modify the character’s stats, or Consumables, which are usable items like potions or spells, etc.
public abstract class InventoryItem : ScriptableObject, ISerializationCallbackReceiver,
  IIconHolder
{
  [Tooltip(
    "Auto-generated UUID for saving/loading. Clear this field if you want to generate a new one.")]
  [SerializeField]
  private string itemID = null!;
  [Tooltip("Item name to be displayed in UI.")]
  [SerializeField]
  private string displayName = null!;
  [Tooltip("Item description to be displayed in UI.")]
  [SerializeField]
  [TextArea]
  private string description = null!;
  [Tooltip("The UI icon to represent this item in the inventory.")]
  [SerializeField]
  private Sprite icon = null!;
  [Tooltip("If true, multiple items of this type can be stacked in the same inventory slot.")]
  [SerializeField]
  private bool stackable;

  public Sprite GetIcon() => icon;

  public string GetItemID() => itemID;

  public bool IsStackable() => stackable;

  public string GetDisplayName() => displayName;

  public string GetDescription() => description;
}
Spellbook
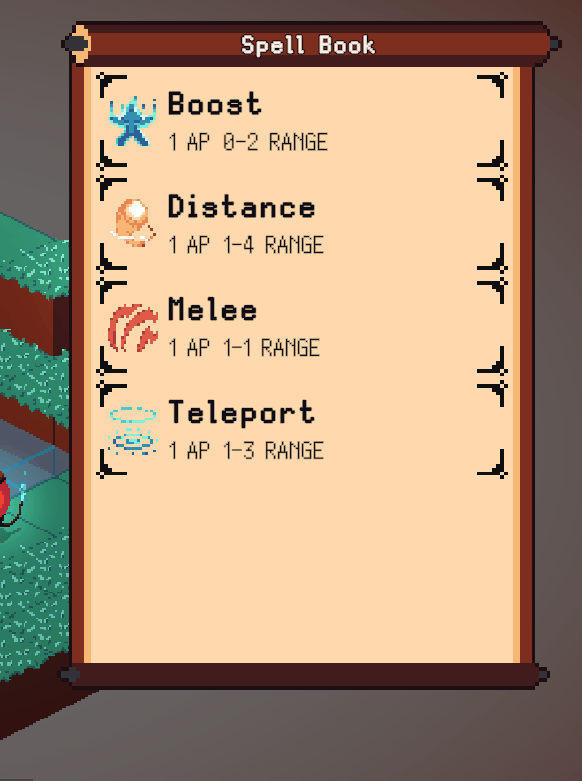
The spellbook functions similarly to the inventory. However, instead of storing items, it stores spells described via a ScriptableObjet to define their effects.
Line-of-Sight Algorithm for Spells
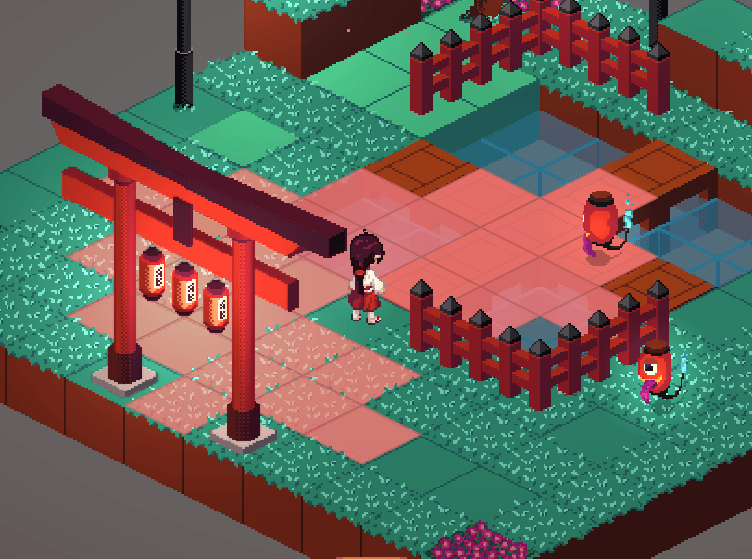
To determine if a unit can cast a spell on a target, it is crucial to check whether there is a clear line of sight between the caster and the target. For this, I use a linear interpolation algorithm that calculates which grid cells the spell must pass through to reach the target. I then verify that none of the traversed cells are blocked by an obstacle.
In this image, you can see that the reachable tiles for a spell (highlighted in red) are inaccessible behind the statue due to the obstruction.
Developed algorithm to calculate lines of sight:
public class LineOfSightCalculator
{
  private readonly Vector2Int fromPosition;
  private readonly Spell spell;

  public LineOfSightCalculator(Vector2Int fromPosition, Spell spell)
  {
    this.fromPosition = fromPosition;
    this.spell = spell;
  }

  /// <summary>
  /// Return all the grid position with a line of sight from the fromPosition value
  /// </summary>
  /// <returns>Array of valid grids position</returns>
  public List<Vector2Int> GetValidGridPositionList()
  {
    List<Vector2Int> validGridPositionList = new List<Vector2Int>();
    for (int x = -spell.GetMaxAttackDistance(); x <= spell.GetMaxAttackDistance(); x++) {
      for (int z = -spell.GetMaxAttackDistance(); z <= spell.GetMaxAttackDistance(); z++) {
        Vector2Int offsetGridPosition = new Vector2Int(x, z);
        Vector2Int testGridPosition = fromPosition + offsetGridPosition;

        if (!LevelGrid.Instance.IsValidGridPosition(testGridPosition)) {
          continue;
        }

        int testDistance = Mathf.Abs(x) + Mathf.Abs(z);
        if (testDistance > spell.GetMaxAttackDistance()) {
          continue;
        }
        if (testDistance < spell.GetMinAttackDistance()) {
          continue;
        }

        if (!HasLineOfSight(testGridPosition)) {
          continue;
        }

        validGridPositionList.Add(testGridPosition);
      }
    }
    return validGridPositionList;
  }

  /// <summary>
  /// Check if a specific targetPosition has a line of sight the fromPosition value
  /// </summary>
  /// <param name="targetPosition"></param>
  /// <returns>Return true if the position has line of sight</returns>
  private bool HasLineOfSight(Vector2Int targetPosition)
  {
    int dx = targetPosition.x - fromPosition.x;
    int dy = targetPosition.y - fromPosition.y;

    int nx = Mathf.Abs(dx);
    int ny = Mathf.Abs(dy);

    int signX = dx > 0 ? 1 : -1;
    int signY = dy > 0 ? 1 : -1;

    int currentX = fromPosition.x;
    int currentY = fromPosition.y;

    for (int ix = 0, iy = 0; ix < nx || iy < ny;) {

      int decision = (1 + 2 * ix) * ny - (1 + 2 * iy) * nx;
      if (decision == 0) {
        // next step is diagonal
        currentX += signX;
        currentY += signY;
        ix++;
        iy++;
      } else if (decision < 0) {
        // next step is horizontal
        currentX += signX;
        ix++;
      } else {
        // next step is vertical
        currentY += signY;
        iy++;
      }

      Vector2Int point = new Vector2Int(currentX, currentY);

      if (!LevelGrid.Instance.IsValidGridPosition(point)) {
        return false;
      }

      GridObject gridObject = LevelGrid.Instance.GetGridObject(point);

      if (gridObject.BlockLineOfSight()) {
        return false;
      }
    }
    return true;
  }
}